Start here
Getting started
Your first ten minutes — the desk, layers and comps, your first animation, and getting a finished file out.
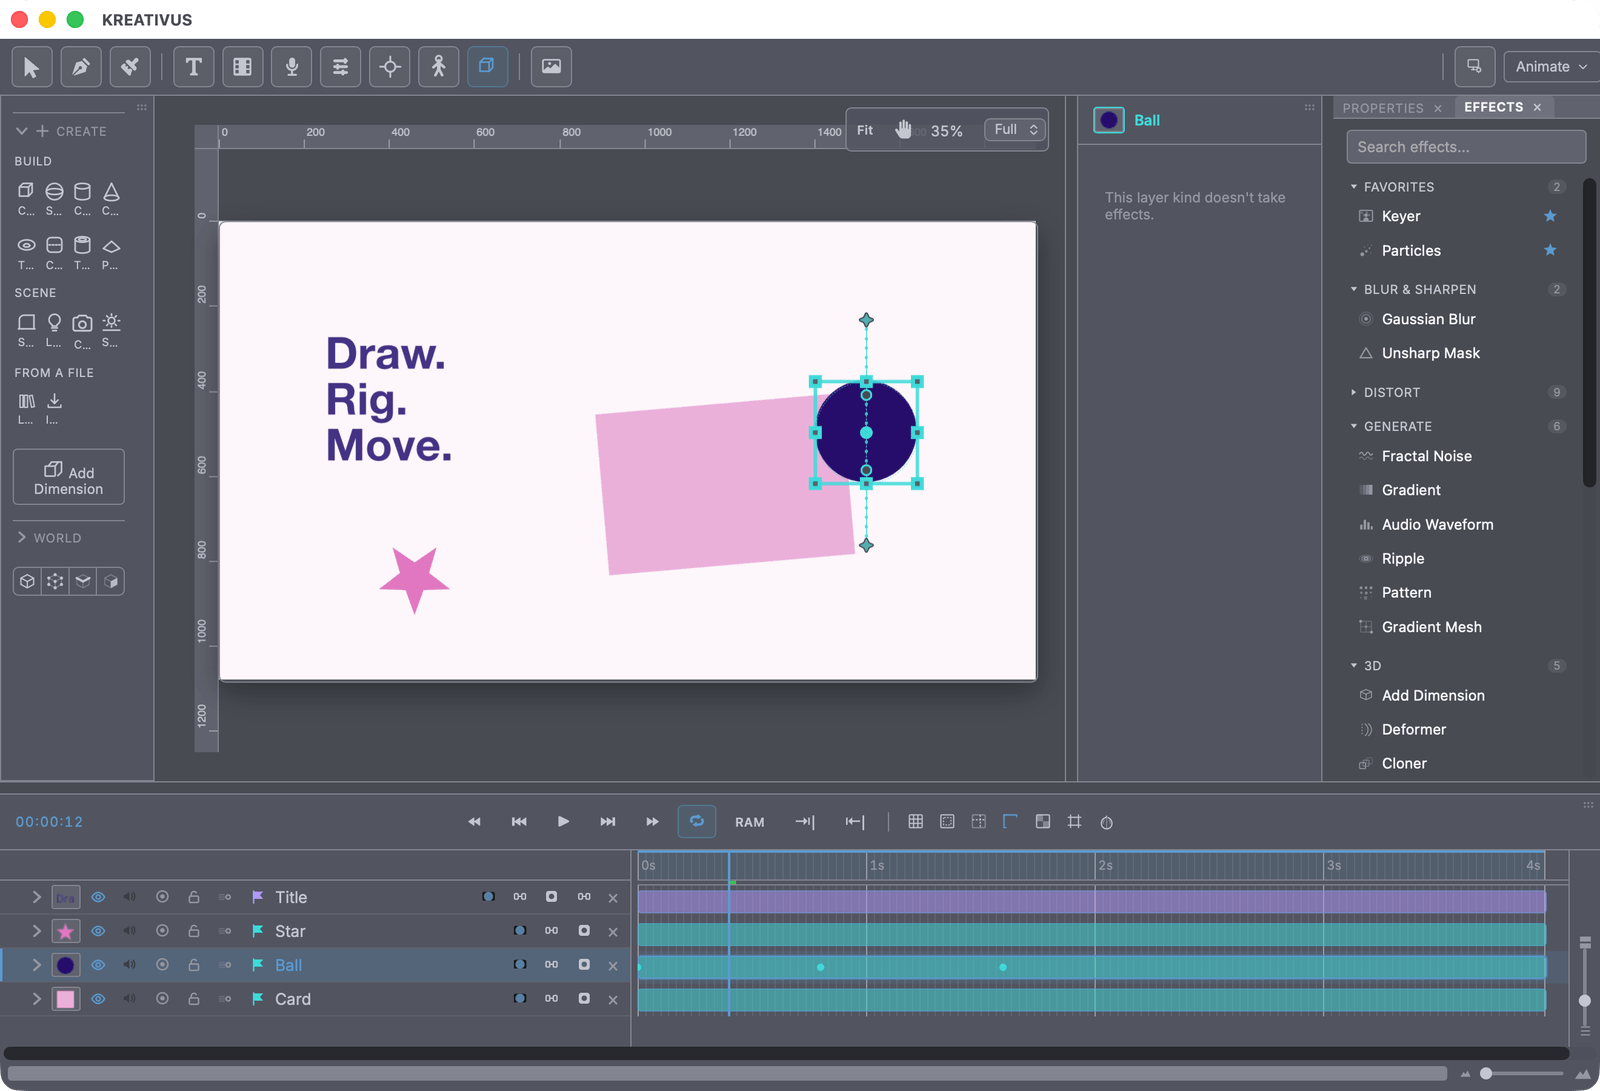
Kreativus is a complete animation studio for Mac: draw, paint, animate, rig, composite and grade in one native app. Everything below is the ten-minute tour; every corner of it then has its own page in this manual.
Launching shows the splash artwork with the version you’re running in its corner, and hands over to the app as soon as it’s ready — click it (or press any key) to skip straight through. The very first time, the app then asks “What will you make?” so it can start you in a workspace that fits.
The desk
- Viewport — the canvas, centre stage. Draw on it, drag things around it, scrub it. Hold Space and drag to pan — the reflex every drawing app trains, and it works under whatever tool you’re holding without putting it down. (A middle-button drag pans too, and H arms the Hand tool for good.) Scroll or pinch zooms around the pointer; ⇧1 fits the canvas to the panel, ⇧0 goes to 100%.
- Timeline — along the bottom: layers as rows, time as columns, keyframes as diamonds. Space plays; , and . step frames.
- Properties — the right side: everything about the selected layer — transform, fill and stroke, effects, masks — each with a stopwatch for keyframing.
- Tool options — under the toolbar: the current tool’s dials (brush size, shape options, selection controls).
- Tools — the left strip: Select (V), Draw (A), Paint (B), 3D (C), Puppet parts, Width (W), and friends.
- More panels live under the Panels menu — Effects, Animation Presets, Brushes, Swatches, Symmetry, Tracking, Puppet board, Mixer, 3D Library, Scopes… Every panel docks, stacks and floats; arrange the desk you want.
- Workspaces are the desk presets, and they live in two places: the switcher at the top-right of the toolbar, and the top of the Panels menu. A workspace remembers its own layout and its own scope — which kinds of tools it shows at all. The first launch asks “What will you make?” (right after the splash) and starts you in the right one; the built-in set covers the kinds of artist the app serves: Studio (everything on, nothing hidden — the home workspace), Draw (a pure drawing desk — boards, layers, no timeline), Color (scopes beside the picture, grading tools), Music (a piano roll with real height), 3D (a wide tool column for objects and sculpting), Footage (tracking and the video/AI set), and Small Screen (everything on, arranged for a laptop lid). Switching into Draw or 3D also puts that room’s tool in your hand — the pencil, or the 3D Create palette — so you can start working without arming anything first; the rest leave your current tool exactly as you left it. Nothing is ever lost by switching: a narrower workspace only hides the UI for creating things outside its focus — everything already in your project keeps working and stays editable in every workspace, effect search still finds the whole catalog, and the full studio is one click away.
- Every workspace’s scope is yours to tune: workspace switcher → Workspace Features… — five checkboxes (Animation, Simulation, Music, 3D, Footage) that apply live, per workspace. Drawing and colour tools are always on. Reset Workspace restores a built-in’s layout and its scope. When a new panel joins a built-in workspace’s default arrangement, it’s added to your saved copy of that workspace once — so a workspace you’d already used doesn’t quietly miss out on the panel it was designed around. Close it and it stays closed.
- Arranging is one gesture with live feedback. Drag any tab: the drop preview morphs smoothly between placements as you move, and it always shows exactly what you’ll get — with a small percentage readout of the share it will take. Near a panel’s edge it offers the slimmest sensible split; carry the pointer deeper and the preview grows with it, all the way to half the panel, with a magnetic stop at 50% (the border firms up when you hit it). Dropping on a panel’s header band — its tab strip — stacks as a tab (a thin bar there says so). Release, and everything glides to its new arrangement.
- Panels can float. Right-click a tab → Float Panel for a free card you can move and resize over the workspace, or drag a tab out past the edge of the panel area. A floating card’s title bar only ever moves it — no drop zones in the way. To dock it back, drag the ⠿ grip at the left of its title bar over any panel and the usual previews light up. Floats are remembered per workspace.
- Some panels open in their own window — right-click → Open in New Window on Effects, Align or Animation Presets puts that panel in a real window you can move to a second screen. It stays fully live: selection follows the main window, and anything you apply from it lands instantly. Close the window and reopen the panel from Panels whenever you like.
Projects, comps, layers
A project (one .kreativus file, plain local data — no cloud, no lock-in) holds compositions: a canvas with a size, frame rate and duration. Those live in the middle of the toolbar — width, height, length and frame rate, always in view, with a presets button for standard canvas sizes at its left. (In a workspace where nothing moves, like Draw, the length and frame rate step aside and only the canvas size stays — File → Comp Settings still reaches everything.) Comps nest inside other comps like footage, which is how repeated elements and multi-shot pieces stay manageable.
Layers are what you make: vector drawings and shapes, raster paintings, text, images, video, frame layers (cel animation), audio (speech, recordings, instruments), captions, 3D objects, lights and cameras, adjustment layers, groups, and invisible control handles. Drag rows to restack, pick-whip to parent, group with ⌘G.
Several layers at once
Click a layer to select it, Shift-click to extend a run, ⌘-click to add or drop one, or marquee-drag on the canvas. Select in the menu bar does the rest: All, Inverse, Select Same ▸ (fill, stroke, weight, opacity, blend, kind, label, font, effect, animated, keys at the playhead, parent), Contents of Groups, and named selections you can Save and recall.
A selected group shows you what it stands for: the artwork inside is outlined on the canvas exactly as if you had selected it directly, and its rows are marked in the timeline — softly, because a Shift-click still extends from what is actually selected and a transform moves the folder rather than its members.
Clicking and marquee-dragging mean different things about groups, on purpose. A click picks the individual shape, even inside a folder — that’s what point and colour work needs. A marquee is a bulk gesture, so what it grabs inside a folder is the folder, which is how a group and a loose layer end up selected together. Ordinary parenting isn’t containment: a limb parented to a torso is still its own object and a marquee selects it as one.
With more than one layer selected, the Properties panel — and the timeline’s own property rows — edit all of them. Two of those behaviours are ours rather than After Effects’:
- One colour reaches everything. Pick a fill or stroke and it lands on every selected layer, every piece of a multi-coloured object, and everything inside a selected group. A folder has no colour of its own, so its swatch reads from the artwork inside it — and marks itself Mixed when that artwork disagrees. Stroke width, taper, dash and trim reach the same places. A compound shape’s picker starts on All shapes; switch it to Shape 3 when you want just that piece.
- Transforms change by amount, not by number. Layers at 40%, 100% and 300% dragged to 150% would all snap to 150% and lose the arrangement you built. Instead the field drives the layer you clicked last and the rest follow by the same amount — the same distance, the same angle, the same factor — so 40/100/300 becomes 60/150/450. Fields the layers disagree about are marked with a dotted underline. Opacity and Anchor stay absolute, because setting them all to one value is what dragging those means.
A Pivot switch above Position says what the selection turns and scales about. Shared (global) treats it as one body pivoting on its shared centre; Each (local) turns and scales every layer about its own anchor, so twenty scattered stars spin where they stand instead of swinging around each other. It applies to the handles on the canvas too, not just these fields — the same drag must not mean two different things depending on where you make it. Position ignores it, since a move is the same either way.
Applying an effect tags every selected layer, and tuning one instance’s dial tunes them all. It is one undo step however many layers were involved.
Your first animation, three ways
- Draw something with the pencil (A) — it fits a clean curve to your gesture.
- The instant way: open the Animate panel and press Pop In. Real keyframes land, properly eased.
- The honest way: select the layer, press P, click Position’s stopwatch, move the playhead, drag the layer. Two keyframes — you’re animating. Right-click them → Easy Ease.
- The alive way: draw with the vector Brush and give the stroke a Boil — it moves forever with no keyframes at all.
Press Space. The first playthrough renders as it goes; RAM Preview fills the cache so it runs full speed. Space is two gestures on one key, told apart by what you do rather than by where the pointer is: tap to play or pause, hold and drag to pan. Stopping still happens the instant you press — you pause on the pose you’re looking at — while starting waits for you to let go, which is what leaves room for the drag.
Make it rich
- Drop an effect on anything — ⌘K, type three letters, Enter. Forty-eight of them, every dial keyframable.
- Import what you have: images (PSD with layers, SVG, RAW, PDF/AI), video, audio, 3D models — or grab CC0 props and skies from the built-in library.
- Undo is everywhere, autosave runs off-thread, and projects reopen exactly as left — playhead, selection and panel state included.
Getting it out
File → Export: MP4 (H.264) for everywhere, MOV (H.264 or ProRes 4444 with real transparency — for compositing in After Effects/Premiere), PNG sequence (frame-accurate, transparent), single-frame PNG/SVG, and audio mixdowns (WAV/MP3/M4A/FLAC). Exports match the preview exactly — the same renderer draws both, and every simulation in the app is scrub-proof by design.
Where next
- Drawing every day? → Drawing & vectors, Brushes, Animated strokes
- Motion first? → Animating, the Animate panel, Text
- Characters? → Puppets & turns
- The effects rack? → start at Effects, then the deep dives
- Film work? → Video & AI, Tracking
- Depth? → 3D and 3D tools
Stuck, confused, or something reads wrong? Tell us — docs bugs count as bugs.