3D
3D in a 2D world
One World: any layer can become 3D where it stands — extrude drawings and text, build primitives, light with real units, grade through AgX.
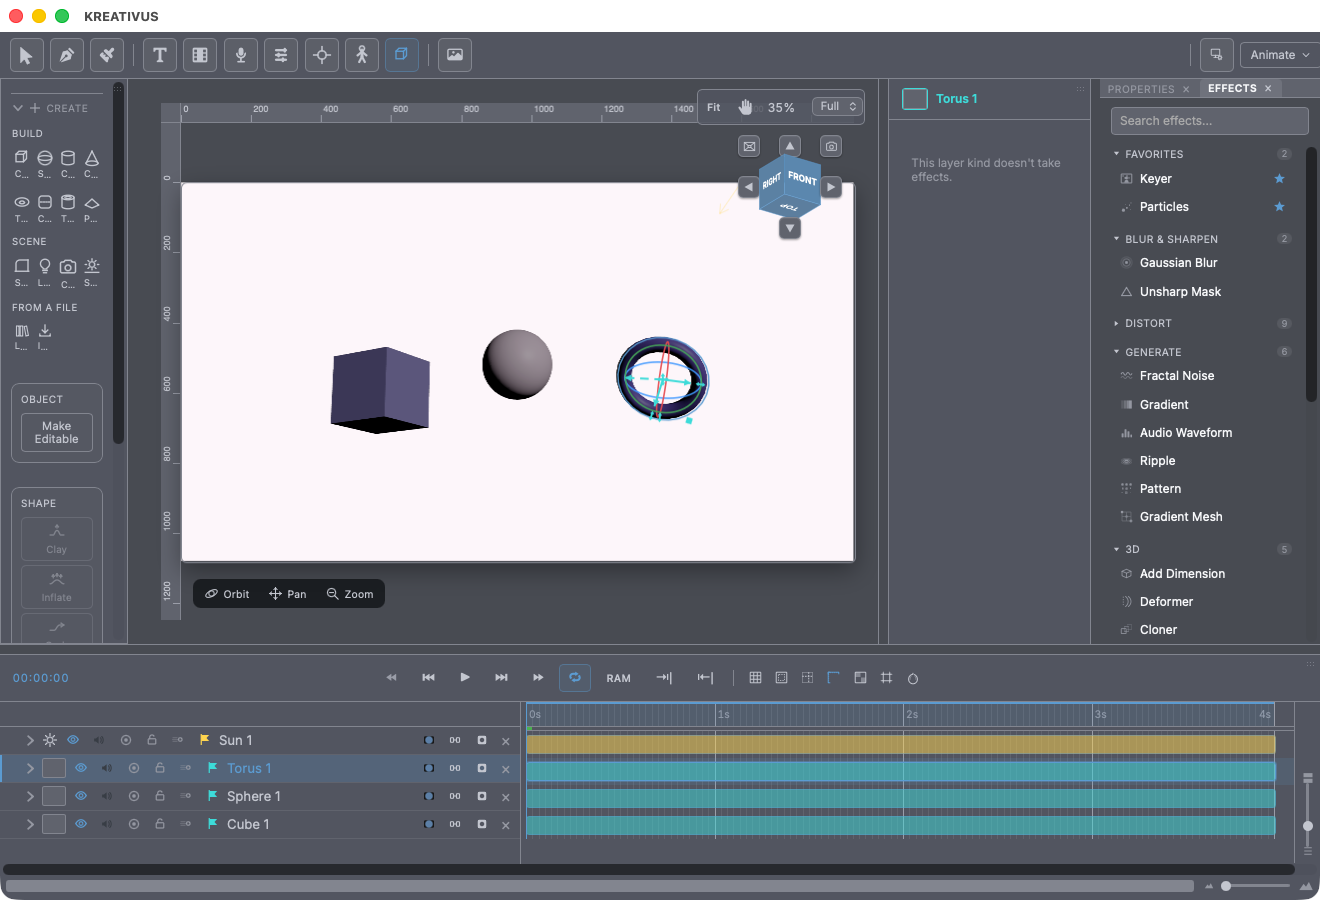
Kreativus does 3D the way an animator wants it: your 2D layers and real 3D objects share one world. There’s no separate 3D mode and no container to manage — a layer is 3D because it has a third dimension, granted in place, without moving a pixel. A drawn card slicing through a cube is hidden and shown per pixel, not composited as a whole card; adjacent 3D layers share one depth pass and one shadow pass. And the After Effects sandwich rule holds: put a 2D layer between two 3D ones in the stack and it splits them into separate scenes, exactly as you’d expect from compositing.
Making things 3D
Add Dimension — the button on any vector or text layer — turns it into a real lit mesh, right where it is: it takes the scene’s lights, catches shadows, and can be pushed back in Z. Seven modes decide what the drawing becomes:
- Extrude — front and back caps with walls between. Six bevel wall profiles (Classic, Convex, Concave, Chamfer, Ridge), plus Twist (symmetrical from the middle — confirmed against Illustrator) and Taper (100 = straight, 0 = pinches to a point).
- Plane — a flat card, no depth. Inflate — a dome/balloon, with Volume running from fully round to a flat-topped box.
- Revolve — spins the drawn profile around an axis (From Left/Center/Right, flippable, with a Segments dial — 6–10 reads deliberately low-poly). Twist here becomes a barley-twist screw thread.
- Sweep — the drawn line becomes a tube: a round section travels the path, following the Width tool’s thickness where you’ve drawn one. Ropes, rails, worms.
- Loft — the layer’s shapes, in draw order, become cross-sections and a surface skins between them. Vases, hulls, square-to-round ducts — an SVG import, a boolean layer, or a text layer’s glyphs.
- Body — draw a stick figure, get a creature: every stroke is a chain of joints and a body grows around the skeleton, limbs melting together where they meet (Melt sets how much), thickness following the Width tool. Rig to Strokes freezes the body and binds it to the strokes — pose the drawing, the creature follows, materials and paint surviving.
Text extrudes from its real glyph outlines — genuine letterform geometry. Shade Smooth (Blender’s auto-smooth by angle) is there when facets should blend.
Primitives & scene objects
Pressing the 3D button (C) takes you to the 3D tools. Hover it and pick a shape to make one straight away; press it again once you’re already there and it makes another of whatever you last made. The 3D flyout builds: Cube (with true filleted corners), Sphere (UV or Ico), Cylinder, Cone (top radius makes a frustum), Torus, Capsule, Tube (real inner walls), Plane — every dimension keyframable — plus two scene-makers:
- Studio — a floor that curves up into walls: the seamless backdrop a product shot is photographed against, as a real object with a transform and a material. Wall Height 0 is a plain floor; Cove sets the curve.
- Sky — see below.
Any surface can become a shadow catcher: it stops being drawn and keeps only the shadow that lands on it, as black transparency — put a Plane under your object, composite over footage, and the object casts a real shadow into the plate.
Materials
Real PBR (the glTF metalness/roughness model), tiered so the common case is fast: a quick row — Color, Metallic, Roughness, Glow — covers 90% of looks; 46 presets in ten families (Metal: chrome, brushed steel, gold, rusted steel, carbon fiber… Fabric: velvet, silk, denim… Organic: skin, clay, wax, jade… Liquid & Glass: water, frosted glass, ice, honey, lava… plus Stone/Wood, Ceramic, Gemstones and six Toon looks); and Material Detail opens the whole desk:
- Per-channel layer stacks (solid / gradient / procedural noise layers with Normal/Multiply/Add blending) plus one texture per channel — base color, metalness, roughness, bump, emissive, reflectance.
- 21 procedural noise types (fBm, turbulence, Worley cells, marble, wood, fire, water…) with an Animation Speed — Water, Honey and Lava genuinely move, at zero per-frame cost.
- The advanced channels a real renderer owes you: IOR, Clearcoat (car paint, lacquer), Sheen (velvet’s edge glow), Subsurface (skin, jade, wax), Anisotropy (brushed metal, silk), Transmission (glass), and Toon shading with banded light, rim and an inked outline.
- Texture maps: base color, normal, packed ORM, emissive — imported models bring theirs along.
Per-part materials: select polygons on an editable mesh, save the selection, give it its own material — a bottle with a glass body and a metal cap is one object.
Lights
Four kinds — Directional, Point, Spot, and real Area lights (Rect softbox, Disc, Sphere bulb, Tube) — with photometric units: lux for sun-class light, lumens for fixtures. A light’s Size drives its shadow softness (bigger source, softer shadow — no fake “softness” dial), Temperature works in Kelvin with preset chips (2700 tungsten … 5600 daylight), Spots can project a gobo image or a manufacturer’s measured IES profile, and intensity, cone and position all keyframe.
Don’t want to build a setup? Light Rigs place a classic one in a click — Studio Softbox, Golden Hour, Overcast, Noir, Neon, Campfire — as ordinary, editable Light layers.
Camera
A physical camera: focal length (mm, with the 18–100mm presets), sensor width, one- or two-node (Target) aiming. Auto exposure meters the stop from your rig each frame — it’s why typing a true value like a 100,000-lux sun just looks right — with a manual EV override in real stops. Lens Blur is real depth of field: with a Target, animating the target is a rack focus.
Sky
A physical daylight model (Preetham) — not a photo, so it keys: the sun crossing a shot, day turning to dusk, haze rolling in are ordinary keyframes. Sun Height and Direction, Haze (2 is an exceptionally clear day, 6 hazy, 10 industrial), Ground Bounce (0.1 wet asphalt → 0.8 snow), Intensity and Sun Size. Eight one-click times of day — Dawn, Morning, Midday, Golden Hour, Sunset, Dusk, Night, Overcast — each just writing the dials, which stay yours to nudge and keyframe. The sky lights the scene through the same path as an HDR environment, and its sun is a real shadow-casting light.
Environment light
Any HDR image can light the scene — imported, from the built-in generated set (Studio, Outdoor Sky, Sunset, Overcast), or from the environment library. Intensity and Rotation keyframe (a slow world-spin moves the light across a still object for free), and Show as Background draws the environment behind the scene when you want it seen, not just reflected.
The look
New comps render through AgX — the film-like view transform Blender 4 made standard: bright light rolls off the way film does instead of clipping, colors desaturate as they brighten. It’s the single biggest reason a render reads as photographed rather than computed. Plus comp-level Bloom (light brighter than the threshold glows past its edges — 2D drawings never bloom, they keep exact colors), Reflections (glossy floors catch the actual scene standing on them), Ambient Occlusion (the contact shadow where surfaces meet), 4× MSAA, and real shadow maps. Working views — Matcap (sculptor’s clay) and Wireframe — never export.
Drafting
The view cube orbits the scene (drag it, or click a face to snap); Front/Back/Left/Right/Top/Bottom/Isometric blueprint views plus a Perspective/Orthographic toggle live on it. Work planes lay a drawing onto the Front, Top or Right plane — draw a floor plan looking down, lay it on the floor, and extrude raises walls rather than pushing a picture of walls at you. Orbit/Pan/Zoom are armed buttons (plain drags) as well as the Alt shortcuts, and Hold-M/R/S transforms modally with X/Y/Z axis locks.
Cloner arrays, path travel, deformers, curve rigs, the model library, importing characters and polygon modelling all live on the next page: 3D tools.
Recipe — a logo done properly. Import or draw the logo → Add Dimension → Extrude, Depth ~40, Classic bevel ~10. Material: Gold. Add a Studio, pick the Golden Hour sky preset, drop the camera’s Target on the logo and keyframe a slow orbit. AgX does the rest.
Drawing in the scene
The pen has always handed the renderer flat picture coordinates, so a line drawn while the view was orbited was never really in the scene — it was painted on the glass in front of it. Now it lands where you drew it.
Press Draw in the scene (the first button in the 3D tool panel’s level strip) and you get the pen you already have, with one thing changed: where the ink goes. In a composition with nothing 3D in it yet, pressing it also opens Navigate 3D at the angle you’re already looking from — the picture doesn’t move, but now there’s a viewpoint to orbit and a world to draw into. Every brush, colour, pressure setting, preset and the Width tool come with it, because it is the same pen — there is no second brush engine to learn or to keep in sync.
Draw on picks the surface:
- Facing me — an upright surface square to how you’re looking, standing at whatever you’re pointing at. Orbit and the stroke stays put. A stroke made this way keeps the exact size and shape it had on screen, so it feels like drawing rather than like modelling.
- On object — lies along the selected object’s surface where the pen is. Draw a face on a head. Off the silhouette it falls back to Facing me, so a stroke that starts past an edge still goes somewhere sensible.
- Floor / Front / Side — the world’s own planes, the same three a layer’s Plane setting names, so a drawing made on the floor and one moved to the floor mean the same thing. Picking one turns the view to face it if you can’t see it from where you are — a floor seen dead level is edge-on, and there is no drawing on a surface you’re looking along. The view glides rather than jumps, so you keep your bearings.
- This drawing — the plane the selected drawing already sits on. Keep adding to the one you’re working on instead of starting a new surface.
- Flat — the old behaviour, and still right for anything meant to sit in front of the world rather than in it.
The plane is drawn before you draw on it. An orange grid shows the surface, with a cross at the depth it stands at — because a depth you can’t see is a depth you’re guessing at, and guessing is what makes drawing in 3D miserable. That depth is the orbit pivot, so F (frame selected) is also how you say “draw here”.
A stroke lands as an ordinary drawn layer standing on that plane, which is the whole point: it keeps shape keyframes, trim paths, brush motion, every effect in the rack, and it’s occluded by 3D geometry per pixel like anything else in the world. Turn on Add to Selected to keep a sketch’s strokes grouped together.
Adding a stroke to a drawing that’s already standing somewhere uses that drawing’s plane, whatever the picker says — points measured against one surface can’t be added to a drawing built on another without landing off it.
Two strokes, any curve — the Guide
Guide is the one that surprises people. Draw a stroke and it hangs into a translucent curtain along the way you were looking. Orbit. Draw again on the curtain. The second stroke is a real curve in space — and neither stroke ever asked you how deep anything was. You answered it by looking from somewhere else and drawing again, which is a drawing gesture, not a 3D one.
A guide here is an ordinary drawn path wearing a flag. So you bend it with the pen you already have, it undoes, it saves, it keyframes, and you can keep several around. Hide one to set it aside; the topmost visible guide is the one strokes land on. Guides never render and never export — they’re scaffolding.
Drawing on your models
On object sticks the ink to the surface. It grips by triangle and barycentric weight rather than by position, which is the difference between a drawing that follows a character’s face and one that slides off it: deform the mesh, sculpt it, pose the rig, animate the whole thing, and the drawing goes along.
The Properties panel shows what a stuck drawing is Stuck to, how many of its points are gripping, a Lift (how far the ink floats off the surface — never quite zero, or it fights the surface for depth and flickers), and two buttons. Re-stick takes the grip again from where you’re standing now: do that after editing the drawing, or after remeshing the object, since a remesh renumbers its triangles. Unstick lets it off; it stays exactly where it is.
Points that miss the surface — a stroke hanging over a silhouette — sit on the drawing’s own plane instead, so the ink never tears open at the edge.
Making it sit right
Two more controls, under In space, for any drawing standing in the world:
- Faces camera — on, the drawing turns to face you however the camera moves, so a mark stays a mark instead of going edge-on and vanishing. Off (the default) it holds the orientation it was drawn at, which is what makes a drawing in space feel like a thing standing somewhere.
- Shows through — draws a faint copy through whatever’s in front of it, so you can see where a stroke is while you build around it. The same trade the wireframe x-ray makes: while you’re working, seeing the hidden part matters more than the picture being correct. It does show up in a render, so turn it off before you finish.
- Depth — push it nearer or further along the way you’re looking. Depth is the one part of a stroke you can’t see while making it, so this is how it gets fixed: orbit until the mistake shows, then nudge.
Drawing with symmetry on works in space too, and mirrors across the surface you’re drawing on rather than across the frame — the stroke is mapped onto its plane before it’s mirrored.
For a stroke with real thickness — a rope, a rail, a worm — give the drawing Add Dimension → Sweep, which runs a round section along it and follows the Width tool.
Line art: drawings out of 3D
The other direction, and the one that makes 3D illustration effortless if you think in 2D. Select a 3D object, open Trace to lines in the 3D tool panel, and press it: you get an ordinary drawn vector layer.
Not a render that looks like lines — real editable paths. So Trim Paths turns it into a write-on, Boil gives it a hand-drawn wobble, the Width tool thins it where it should thin, and you colour it like anything else you drew.
Three kinds of line, each switchable:
- Outline — where the surface turns away from you. The shape of the thing, and the only kind that moves as the camera does.
- Folds — where the form changes direction: a jaw, a knuckle, the edge of a box. The Fold dial sets how sharp a fold has to be to count (35° finds a box’s edges without covering a sphere in its own tessellation).
- Edges — the rim of an open surface.
Hide what’s behind leaves out the lines the form itself hides, which is what makes it read as a drawing of a solid thing rather than a wireframe. Smooth is the same fitting the pencil uses.
It traces once, from the frame and the view you’re on — deliberately. Lines re-derived every frame boil, which is what makes automatic line art look automatic, and regenerating would throw away the edits the whole feature exists to allow. Pose, trace, draw on top.
The 3D Library panel
The Poly Haven library — hundreds of free CC0 props, each with a preview — has always been a dialog you open from the Create flyout. That’s the right shape when you want one model and the wrong one when you’re dressing a scene, because it closes itself the moment you place something.
So it’s also a panel. Same browser, same catalogue, same installs; it simply stays open. Search, pick, place, pick again. Installed models keep their own tab, so re-placing one you already downloaded doesn’t touch the network.
The dialog hasn’t gone anywhere — Tool options → the 3D tool’s Create flyout → Library still opens it, and the Environment card’s Library… still opens the HDRI half (environments stay a dialog, since choosing one applies to the whole composition rather than adding to it). The panel stands open in the 3D workspace under Properties, and lives in the Panels menu everywhere else.
The 3D workspace
The workspace switcher has a 3D preset: the Tool options column comes wide (the Create grid, Edit levels and Sculpt brushes all live there), switching in arms the 3D tool so the Create palette is live the moment you arrive, the 3D Library stands open under Properties, and the scope keeps 3D and animation tools in front. Anything else you need still answers in effect search, and 2D layers behave exactly as they always do.